Post contributed by: Jocelyne Adkins
Although July has already found us, I felt compelled to post a few more exciting projects we completed during the last 2 weeks in May, before summer vacation. Below is a post that highlights our visit with artist Brent Fogt:
On May 21st, we were thrilled to welcome Brent Fogt, a talented artist currently working in Oak Park. Brent creates installations and intricate drawings inspired by sea-life, aerial views, maps and plants. He worked with our Monday students to create a window installation in which plants were coaxed (as they grew) to interact with constructed forms: the wire and yarn forms were created by the students and the organic crocheted structure from which the forms were suspended was created by Brent. In the photo below, you can see how the bean plant wound itself around the yarn and wire form to then find its way into the crochet structure (upper right side of photo).
 |
| interaction of plants with both the hanging wire/yarn forms and the crocheted structure |
The concept for this project was borrowed from earlier art installations created by Brent, in which plant forms grew and intermingled with his hand-crocheted forms, either suspended above the plants or placed upon the soil from which the plants would emerge. The plants' anticipated growth was based upon the relation or direction of light provided within the exhibition space. His installation work, as well as his intricate drawings, reference change and metamorphosis. Please visit the following link to view Brent's prior installations. I found them captivating and breathtaking!
http://brentfogt.com/?page_id=119
This is a picture of Brent with 5 of our students (yes 5, look closely and you will find Matthew just behind Leila and Lily). They are standing in the armature that Brent and the students created and on which their forms will be suspended.
 |
| Visiting Artist Brent Fogt with Daysha, Jessica, Leila, Lily and Matthew (between Leila and Lily) |
Below are photos that document the stages of our project. A week prior to Brent's visit we planted pinto beans to sprout into plants ready for use in our installation. Despite a heat wave that nearly knocked them out over the Memorial Day weekend, the plants bounced back and our installation prevailed!
Colorful craft wire (above) and yarn (below) the plants could interact with as they grew.
 |
| Brent demonstrating one way to begin a sculptural form using linear elements |
 |
| Spirals! These forms are irresistible with thin flexible wire in your hands : ) |
 |
| Matthew experimenting with wire and yarn |
 |
| Cyrus examining his creation |
 |
| Matthew with a chain of linear forms |
 |
| A bundle of twisted wires |
 |
| Many wire spirals joined together to create a spiral ball |
 |
| Leila at work |
 |
| Brent securing the base of the armature that will support the crocheted structure |
 |
| Matthew assisting Brent with the vertical supports |
 |
| Leila assisting Brent |
 |
| Daysha, Leila and Jessica securing the crocheted organic forms to the armature |
 |
| Lily and Brent |
 |
| Leila inserting the yarn and wire forms through the crocheted structure |
 |
| Detail of crocheted structure and hanging yarn and wire forms |
 |
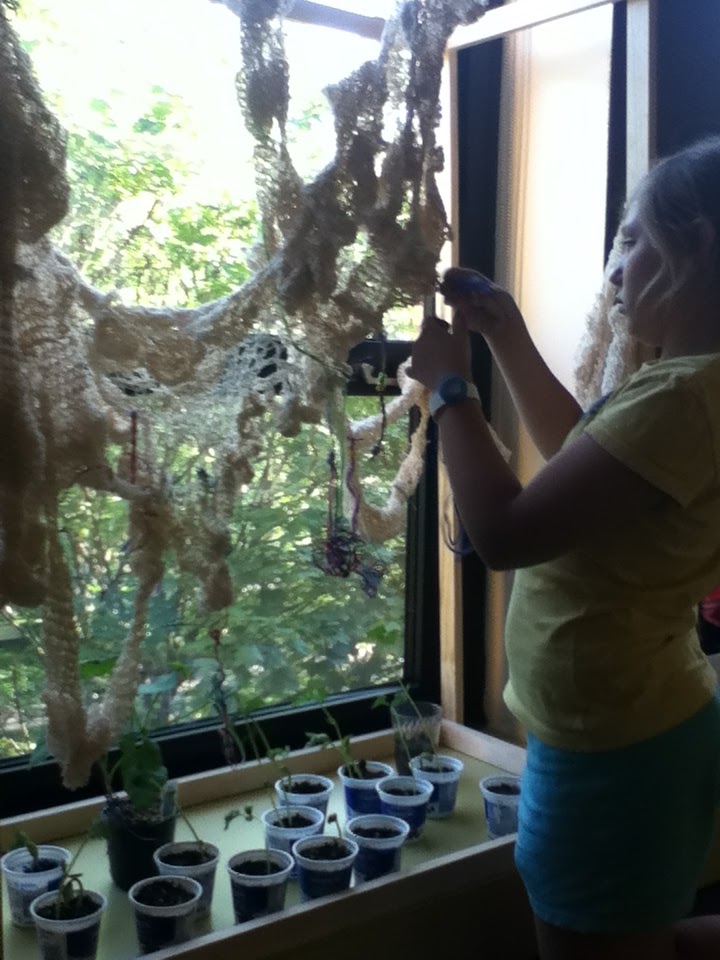
| Window installation of armature and plants. Lily makes finishing touches. |
 |
| Installation as documented on June 1st, last day of school |
 |
| Close-up view, slightly left of the installation's center |
If you look closely in the upper left hand corner of the photo above, you can see the bean plant spiraling around and through the crocheted structure.
 |
| The same position (left of center), looking down, with plants included |
In the photo above, note the blue-green twisted bundle of wires and how it cradles the bean plant, lending support for the plant's vertical growth. On the upper right side, you can see where the plant is just about to make its way into the crocheted structure.
 |
| The bean plant on the right rests against the hanging wire/yarn form for support |
Above, you can see the interaction of the plants with both the hanging wire/yarn forms and the crocheted structure (upper right)
 |
| A close-up view of a bean plant as it spirals around the crocheted form |
This was such a fabulous project, capturing how living forms change day-by-day and the ways in which they respond to their environment and conditions. Despite almost losing the plants during the excessive heat over the Memorial Day weekend, they we nurtured and given the opportunity to thrive again. Students experienced both the fragility and resilience of these bean plants and how our own interventions (removing wilted leaves and providing water and light) can make a huge difference in their survival and continued growth.
On the last day of school, we distributed the plants to the students to take home. There, they will continue their growth in new environments. Students also took home their wire and yarns forms. The crocheted-structure was packed to return to Brent and our armature was put in storage for future use in a Beye Discovery project (thanks to Daysha, 4th grader, for this suggestion). Hopefully all will continue to "live on" in their new environments and in new ways.
Lastly, all of us were so appreciative of Brent's work with us! We do hope that Brent will visit with us again next year to share more of his creative process!!!